UPDATE: Shortly after the below, I undid the replacement. The 3rd party bulbs were much whiter, and seemed to aim higher as I got several “flashers” from oncoming traffic thinking I was using high beams. Dealing with the bulb outages may be dangerous to me, but blinding oncoming traffic is dangerous to others. So, YMMV.
Forgive me, the first part of this post covers some back story. If you just want to see the process, feel free to skip ahead to paragraph 4. Thanks! Please pay special attention to the bolded text, as it’s the main tips I have to offer that weren’t directly covered in other documentation I found.
 I own a 2007 Prius Touring Edition, that came with HID headlights. Which, is nice, since they provide a lot of visibility at night. But, around the time I had the car serviced for a CHS (Coolant Heat Storage) water pump service bulletin (TSB-0087-08) my driver’s side light began flickering. Then, it just went out one time. But, upon turning the lights off, then back on, it came back, and didn’t go out again for about a year (odd). Then, it started to do it in ernest, and it’s “friend” joined in (the passenger side started to go out). But, all along, turning off the headlights, then back on, they would both come back on. So, I was a slacker, and waited to call Toyota about it (one time it did it, I stopped by a dealer, and they quoted me $450/bulb!).
Finally, about 3 months ago, it started getting bad. On a given nighttime drive, one or both of the lights would go out at least once (they never went out together at the same time). So, I brought the car into the dealer, and they quoted me $150/bulb, plus $100 in labor. Better, but still $400! So, I called up Toyota Customer Care, and spoke to them. First person said there was nothing they could do, so I asked to be escalated. They took my name and number, and said they’d call back. Which, they did in a couple hours. After some discussion, and another call back, they said they would cover the cost of one of the bulbs (they couldn’t get both to go out at the dealer), but not the labor… so, $100 to do one bulb. I said I could do both myself for $60 ($50 for a pair of bulbs online, and about $10 shipping). They were flabbergasted that it was that cheap. I said “Thanks, but no thanks” and left it at that (with a few choice words about how horrible it was that Toyota was not addressing this issue).
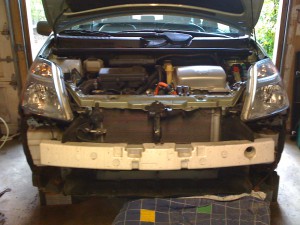
So, I went online, and as per numerous reviews, I ordered some D4R 4300k (4300k is the stock color temperature for the Prius, although I find these 4300k bulbs to be “whiter” than the OEM ones were) bulbs at High Performance Bulbs for $49.99 and less than $10 shipping, and had them here in 5 days (from NJ to OR!). I first tried the “lazy” method (please note, changing the Driver’s side this way is not too difficult. However, the passenger side is extremely tight, and unless you’re rail thin, you will not be able to replace that bulb) of not removing the bumper… it proved fruitless as it’s difficult to know which way to turn the bulb enclosure back, and the space is quite limited. So, I put the new bulbs on the bench and said I’d come back to it in a couple weeks.
So, this last week, while driving for no more than 20 minutes at night, the drivers side bulb went out 5 times. So, I decided to go ahead and do it this weekend. So, yesterday, I did.
Tools you’ll need: Phillips Screwdriver, 10mm socket, matching ratchet, small flathead screwdriver. And if you get the same bulbs as I did, a relatively coarse file for filing the slot on the bulb collar. The wikiHow article recommends WD40, but I wouldn’t recommend that as none of the bolts were “stuck”). If you have it, I’d HIGHLY recommend some type of electric screwdriver capable of taking the 10mm socket. It’ll make things a LOT faster.
You’ll also need some kind of car ramps, and something to block the back wheels with to make things a bit safer.

Following this good how to on wikiHow (and related YouTube videos, which take a while to watch, but are good to watch before hand), I did the work in about 1.5 hours of productive work, with only one (or two, depending on how you look at it) caveat. The “square” alignment notch on the replacement bulbs was too narrow to install in the bulb housing. So, I had to take the file on my Leatherman and widen the notch by probably 1/32″ to get it to fit. Once I did that, it installed great.
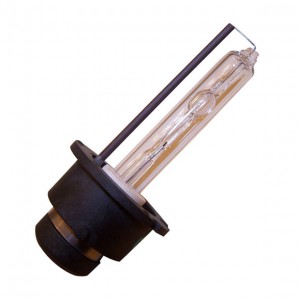
While I’m sure if I’d paid attention, and didn’t just go for the easiest fit, I would have realized that I’d installed them sideways at first, it would have been quicker, but as a note to anyone else that tries. Make sure the “filament” (the “wire” that runs up the outside of the bulb, see above picture) is installed on the bottom side of the bulb (when the casing is upright). If it’s installed to one side or the other, it’s not right, and may interfere with the “high beam” functionality (on the Prius, a “shield” shifts when you engage the high beams, rather than on some cars where another filament lights).

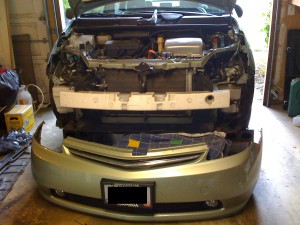
I’d imagine if I did this again in the next couple weeks, I could do the whole process in 45-60 minutes. It’s not difficult, and the hardest part, as I’ve seen others echo elsewhere, is getting the bumper aligned and back on. One thing you will notice is how much dirt accumulates in the area of the car that’s exposed as you do this install (especially what will fall out when you remove the plastic skid plate from the bottom). So, I’d recommend taking this opportunity to use a ShopVac to remove all the random debris. You’ll rarely get this chance, unless you fancy the idea of removing the bumper to clean your car. =)
I found that having my Bosch Pocket Driver (PS20-2), with a 10mm socket, was extremely useful for this job. The only screws it was unable to remove, and I had to use a ratchet on, were the two “side” (those on the sides of the car, above the wheel wells) bolts for the headlights. I also didn’t use it for the clips (obviously), but otherwise, it worked great. If you do use a electric screwdriver of any type, remember to turn down the torque when you reinstall the screws that run into plastic (any of the screws that are very coarse threaded).
Another note: You CANNOT test the new bulb unless the other headlight is also installed! When I got everything apart, I removed both headlights. I then tried to test one without the other installed. I found that turning on the headlights would cause the new one to light for about 1 second, then it would go out. Once I hooked up the other headlight, it stayed lit. Seems like it’s some resistance thing *shrugs*. So, test one, then do the other. Also, make sure to test normal headlight function, then high beams, turn signals, running lights, etc. I had some initial issues with the high beams as the bulbs were installed “sideways” and were interfering with the high beam functionality (as I discussed earlier). So, TEST! You don’t want to put everything back together only to realize something doesn’t work, and have to take it back apart.
Also, I’d recommend being extra diligent (have a helper) when you reinstall the bumper. I initially tried to put it on and had one of the “clips” bent so that it preventing install. This was a quick fix, but if I’d tried too hard to get it on, it might have broken that clip.
All and all, I think the new bulbs are “whiter” than the old ones (probably because they’re new?), and it was certainly worth doing it myself rather than paying the dealer. While it would be cool to have small enough hands/arms to do the “lazy” method, it really wasn’t that big of an issue to do it the “hard” way if you’re at all mechanically inclined (I mean, if you can handle putting together Ikea furniture, you’re capable of doing this, if you have, or have access to, the tools). Just take your time, and follow the instructions. Or, get a friend over that knows something about cars, and pay them in beer (after! Intoxication doesn’t really go well with auto maintenance).
Have fun, and feel accomplished! You just saved yourself a bunch of money, and a possible ticket for a “burned out” headlight!